Mint Chocolate Chip Ice Cream Cake
- By Amy Dong
- Updated May. 30, 2025
I’ve been making this Mint Chocolate Chip Ice Cream Cake for birthdays for years now. It’s a delicious version of the Dairy Queen classic that my family continues to request each year.
In This Article
This post may contain affiliate links, at no additional cost to you.
Why This Recipe Stands Out
This Mint Chocolate Chip Ice Cream Cake is my homemade version of the Dairy Queen classic, but even better. Here’s why I love serving it up for birthdays and warm-weather celebrations:
- That Fudge + Crunch Combo: The cookie crumble and homemade fudge center give you that nostalgic DQ-style texture. It’s just as craveable as our Cookies and Cream Ice Cream.
- Mix and Match Your Flavors: You can totally swap in different ice creams. I’ve done layers of Snickerdoodle Ice Cream before, and it’s always a hit.
- No Oven Needed: Just layer and freeze. It’s a low-lift dessert with maximum payoff, just like our Easy Chocolate Ice Cream, but stacked into something show-stopping.
- It’s Made to Celebrate: Decorate it with whipped cream and candles or serve it straight from the freezer. It’s the ultimate party cake, especially when I want something as memorable as our Banana Chiffon Cake, but chilled and summer-ready.
Key Recipe Ingredients
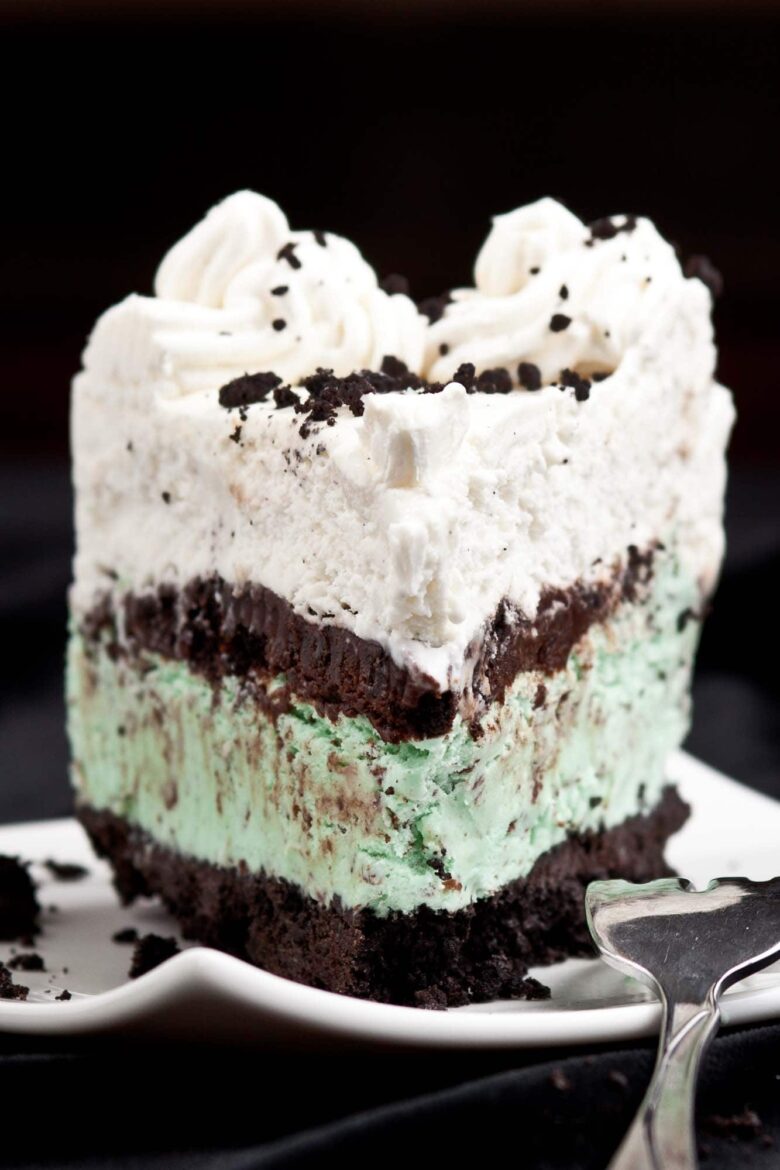
- Oreo Cookies (Filling Removed) – These chocolate cookies create the rich, crumbly base and signature crunch layer of the cake—just like the classic Dairy Queen version.
- Mint Chip Ice Cream and Vanilla Bean Ice Cream – A dreamy combination of flavors that layer beautifully. Let them soften slightly so they spread smoothly and freeze into perfect layers.
- Homemade Fudge Sauce – Mixed with crushed cookies, this gooey layer adds deep chocolate flavor and that irresistible fudgy crunch center.
- Homemade Whipped Cream – Light, fluffy, and homemade, this final topping gives the cake a creamy finish and makes it celebration-ready.
Substitutions And Variations
Here are some of our favorite substitutions and variations:
- Ice Cream Flavors: Mint chip and vanilla bean are a classic combo, but you can swap in cookies and cream, chocolate, strawberry, or snickerdoodle ice cream to fit any celebration or craving.
- Cookie Crust: Classic Oreos bring rich chocolate flavor, but feel free to use chocolate graham crackers, chocolate wafer cookies, or even Thin Mints for a fun minty twist
- Decorating Ideas: Garnish with mini chocolate chips, extra cookie crumbles, or colorful sprinkles to match any party theme.
Tips for Success
- Remove the cream filling from the Oreos before crushing. This keeps the crust from getting too soft or greasy.
- Press the cookie crust firmly into the pan using the bottom of a glass for a smooth, compact layer that holds up well.
- Let each ice cream layer soften slightly so it spreads easily without pulling up the layer underneath.
- Mix the fudge sauce and cookie crunch while the first ice cream layer is freezing – this saves time and helps the texture set up properly.
- Freeze each layer until firm before adding the next to prevent sliding or mixing.
- Let the cake sit out briefly before removing the springform ring so the sides release cleanly.
For full list of ingredients and instructions, see recipe card below.
How To Prep Ahead
Take a look at our best prep-ahead strategies for this recipe:
- Make the Components Ahead: Whipped cream and fudge sauce can both be made up to 2 days in advance. Store them covered in the fridge until ready to use. Let the fudge sauce sit at room temp a bit before spreading if it’s too firm.
- Freeze Until Ready to Serve: Once fully assembled and decorated, keep the cake in the freezer for up to 1 week. Before serving, let it sit at room temperature for 5–10 minutes to soften slightly for easy slicing.

Frequently Asked Questions
A springform pan makes it easier to remove the cake cleanly, but if you don’t have one, you can use a regular 9-inch cake pan lined with parchment paper for easier lifting.
Let the cake sit at room temperature for 5–10 minutes before slicing. Use a sharp knife dipped in hot water (then wiped dry) for cleaner, smoother cuts.
Removing the cream helps the crust and crunch filling stay crisp and not overly sweet. It also helps the base set up better when mixed with butter.
Definitely! Add chopped nuts, caramel drizzle, or a chocolate shell layer. You can also swap the fudge crunch for crushed candy bars or cookie dough chunks.
The cake keeps well in the freezer for up to 1 week. Be sure it’s tightly wrapped to prevent freezer burn and preserve the best texture and flavor.

Mint Chocolate Chip Ice Cream Cake
Ingredients
- 15.4 oz Oreo cookies, cream filling removed. Reserve 8 cookies for the crunch filling.
- 7 tablespoons salted butter, melted
- ½ gallon mint chip ice cream, or other flavor
- ½ gallon vanilla bean ice cream, or other flavor
- 1 cup fudge sauce, homemade recipe or store-bought
- 2 cups whipped cream, homemade recipe (highly recommended) or store-bought
Instructions
- Do Ahead: Make fudge sauce and whipped cream, and set aside in fridge.
- Coarsely break up 8 chocolate cookies, filling removed, into bits for the crunch filling. Set aside.
- Process remainder of chocolate cookies into fine crumbs, using food processor – or enclose cookies in heavy duty freezer bags and crush finely with rolling pin. Combine fine chocolate crumbs with melted butter. Mix well.
- Lightly grease bottom of a 9 inch springform pan, and press crumb mixture tightly and evenly into bottom of pan* Place pan in freezer.
- Meanwhile, allow mint chip ice cream to soften at room temp about 5-10 minutes. Spread approx. three-fourths of the entire tub of ice cream evenly over crumb crust (or use as much as you’d like.) Place pan in freezer.
- Mix 1 cup of lukewarm fudge sauce with the 8 coarsely broken cookie bits. Spread this filling evenly over first ice cream layer, leaving 1 cm space around edges. Freeze 30 minutes.
- Slightly soften vanilla bean ice cream, and spread about three-fourths of entire tub evenly over the fudge filling. Freeze until firm.
- Decorate with homemade whipped cream as desired. Keep frozen until ready to serve. Before serving, let sit at room temp approx. 5 minutes, and remove carefully from springform pan.
Notes
- Use a springform pan for easy release and clean edges – just run a warm knife around the edges before unlocking the pan.
- Soften the ice cream slightly before layering, it should be easy to spread but not melted. This helps you get smooth, even layers without mixing flavors.
- Tip: Use bottom of a flat-bottom cup to press the Oreo crust into the pan – this helps it set solidly and hold up when slicing.
- Reserve some whipped cream for decorating just before serving. It gives the cake a fresh, bakery-style finish that holds well for photos and parties.
- Let the cake sit at room temp for about 5–10 minutes before slicing for cleaner cuts and easier serving.
- This recipe is part of our Ice Cream Recipes Collection.
Nutrition (per serving)
More to Cook And Eat
- Oreo Blizzard Recipe – This DQ Style Oreo Blizzard needs only 3 ingredients and results in a creamy, cool treat everyone adores. Whip it up in just 5 minutes.
- Ice Cream Bon Bons – These Ice Cream Bon Bons are the perfect mini bite-sized ice cream treat with balls of mint chocolate chip ice cream coated in a chocolate shell! They’re super fun to make ahead and taste incredible.
- Fudge Popsicles – These Fudge Popsicles are creamy, super chocolatey, and way better than any store bought variety. You just can’t beat homemade flavor. Perfect way to get your chocolate fix and cool off at the same time.
- Bananas Foster Ice Cream – This 5-minute Bananas Foster Ice Cream is a sweet treat that’s both casual and sophisticated. The caramelized bananas over vanilla bean ice cream are decadently delicious and so easy to make!